Difference between revisions of "User:066AspirantArchiver"
| Line 77: | Line 77: | ||
| − | == United Rebel Front Tutorial == | + | == [[File:URF.png]] United Rebel Front Tutorial == |
| − | + | Finish the UNSC guide then paste it over and replace as needed, also use the assault bit from cov guide. | |
| + | |||
| + | The URF consists of several different groups united by their hatred of the Unified Earth Government, ranging from disgruntled colonists to political extremists. <br>'''Limited to select gamemodes.''' | ||
| + | |||
| + | |||
| + | |||
| + | |||
| + | |||
| + | |||
| − | |||
Guns | Guns | ||
Decide attack method | Decide attack method | ||
| − | [[ | + | |
| + | {|border="1" class="mw-collapsible mw-collapsed" cellpadding="6" cellspacing="0" | ||
| + | |+ style="text-align:left;"| | ||
| + | |'''<big>Beginners are advised to start with the "Insurrectionist" role due to their lack of responsabilities</big>''' | ||
| + | |||
| + | ''Note: This guide uses the assault phase of the [[Revolution]] gamemode on the map [[KS7]] as an example. Some things may vary in actual gameplay, but the general idea is the same'' | ||
| + | |||
| + | == Briefing == | ||
| + | [[File:CRSTutorial.png|600px|thumb|right|<center>Your staging area and your only way to return home.</center>]] | ||
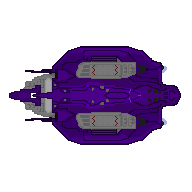
| + | It's time. The ''Retribution'' is here | ||
| + | |||
| + | |||
| + | |||
| + | == Gearing Up == | ||
| + | Onboard some vessels you may need to follow [[File:SignArmory.png]] '''these''' floorsigns to find your armory, but on ODPs they tend to be just outside the bunks. | ||
| + | Once you've made it there, you'll find the [[File:VendorMiscUNSC.png]] '''Miscellaneous Equipment Vendors''' and the standard [[File:VendorEquipmentUNSC.png]] '''Equipment Vendors'''. These vendors have everything that a marine needs to kick ass and make Earth proud, but for now we'll keep it simple with a basic loadout: | ||
| + | |||
| + | From the [[File:VendorMiscUNSC.png]] '''Miscellaneous Equipment Vendor''', you'll want: | ||
| + | <blockquote> | ||
| + | * [[File:Box.png]] '''Marine Armor Kit''' - This will stop a few rounds from hurting you until it breaks. Comes in a [[File:MarineArmorGreen.png]] few [[File:MarineArmorBrown.png]] different [[File:MarineArmorWhite.png]] colors, along with a Medic variant for each and a spaceproof variant. | ||
| + | * [[File:IFAK.png]] '''Infantry First Aid Kit ''' - This kit has medicine that will allow you (or another marine) to stay alive, click your uniform with it on your active hand to attach it. It contains: | ||
| + | <blockquote> | ||
| + | * [[File:BiofoamCanister.png]] '''Biofoam Canisters''', full of a miracle chemical that can do many things such as heal wounds, broken bones and repair organs to an extent, but more severe cases will warrant additional aid. '''Injecting more than one canister within a short time will overdose and kill you.''' | ||
| + | * [[File:GreyPill.png]] '''Bicaridine''', for healing <span style ="color:#FF0000">brute</span> damage resulting from ballistic weaponry, mainly used by the UNSC or the United Rebel Front. | ||
| + | * [[File:RedPill.png]] '''Dermaline''', for healing <span style ="color:#f5a442">burn</span> damage resulting from flames or plasma weaponry, the favorite of the Covenant. | ||
| + | * [[File:PolyPill.png]] '''Polypseudomorphine''', a super-painkiller that will make you nigh invincible but also obscure your vision and negatively impact your accuracy. | ||
| + | * [[File:GreyPill.png]] '''Iron''' and a [[File:ChocolateBar.png]] '''Chocolate Bar''', to fix blood loss resulting from bleeding or repeatedly taking plasma hits. | ||
| + | </blockquote> | ||
| + | * [[File:AmmoBeltUNSC.png]] '''Ammunition Storage Belts''' - They let you carry up to 7 magazines/shell boxes/etc, along with other things like emergency oxygen tanks, knives and armor repair kits. | ||
| + | * [[File:ARK.png]] '''Armor Repair Kits''' - These let you repair your armor, keeping it in shape and stopping bullets. Comes in a [[File:ARKMini.png]] miniature variant as well, able to fit in smaller spaces such as your armor's storage and repair armor at a faster speed, but holding less repair materials. | ||
| + | <blockquote> | ||
| + | <blockquote> | ||
| + | <big>'''!'''</big> You can use a [[File:HardcaseGenericUNSC.png]] '''Tactical Hardcase (Armor Kits)''' to store three of them in a single pouch slot. Different hardcases allow for similar effects, though this only works for their designated type of item. | ||
| + | </blockquote> | ||
| + | </blockquote> | ||
| + | * [[File:Earmuffs.png]] '''Earplugs''' - To prevent the long-lasting deafness from things exploding in your face, something that happens often. | ||
| + | </blockquote> | ||
| + | |||
| + | Now, from the [[File:VendorEquipmentUNSC.png]] '''Equipment Vendor''', you have a few weapon options to choose from: | ||
| + | <blockquote> | ||
| + | * [[File:M6D_New.png ]] '''M6D Magnum''' - Packs a punch while letting you move without a slowdown, but it deals less damage against shielded enemies than other options. | ||
| + | * [[File:M45.png]] '''M45 Tactical Shotgun''' - An older shotgun model, but it '''''will''''' screw over anything that you can close to. Can be loaded with buckshot or slugs (''or both!'') for raw damage or armor penetration, respectively. Also requires to be pumped after each shot. | ||
| + | * [[File:M392.png]] '''M392 Designated Marksman Rifle''' - Great for punching through armor and a few kinds of objects such as airlocks, vendors and lockers. Accuracy improves while using the scope. | ||
| + | * [[File:BR55.png]] '''BR55 Battle Rifle''' - A middle point between the DMR and the AR, this rifle comes with long-range capabilities and a decent volume of fire. | ||
| + | * [[File:MA5B.png]] '''MA3B Assault Rifle''' and the [[File:M7smg.png]] '''M7 Submachine Gun''' - Both are great leadspitters sporting high firerate and big magazines, but the MA5B is more accurate at range while the M7 has no slowdown and can be used with one hand. | ||
| + | [[File:NewbLoadoutUNSC.png|thumb|Once you're done, you should have something that looks like this. Experiment to find what suits you best!]] | ||
| + | </blockquote> | ||
| + | |||
| + | After you've picked a weapon, remember to vend yourself some ammo for it. You can also store [[File:CombatKnife.png]] '''Combat Knives''' in your boots and [[File:M9.png]] [[File:SmokeGrenadeUNSC.png]] '''Grenades''' in your armor. As these are the bare essentials, you'll be left with some room for variation in your kit; you could try pairing an MA5B with a Magnum and a hardcase with ammo for it, or a [[File:Machete.png]] '''Machete''' if you're feeling brave. | ||
| + | |||
| + | Once you're geared you must also ensure that you're well fed, as it will allow you to move without a hunger slowdown and help your blood regeneration, useful for avoiding plasma bolts and not dying from them. The mess hall is located directly starboard (i.e. north) of your bunks and has a few voice-operated machines called [[File:Replicator.png]] '''replicators''' that can get you something to eat, just say "menu" in their proximity to know what's available. | ||
| + | |||
| + | == Making Friends == | ||
| + | [[File:RabbitShuttle.png|thumb|right]] | ||
| + | No single URF cell can stand alone, which is why you have access to a [[File:MissionTerminal.]] '''Mission Terminal''' that can be used to take contracts for different factions. While ignoring them is an option, the gear they offer can greatly increase your odds of success. | ||
| + | <blockquote> | ||
| + | * [[File:Khoros.png]] The Khoros Raiders, bloodthirsty marauders offering advanced melee weapons and [[File:Spice.png]] '''Talista Spice''' to allow you to close the distance and use them. | ||
| + | * [[File:Olympus.png]] Olympus Council - A secretive profit-driven cabal willing to issue high-tech gear such as EMP grenades, Thermal Goggles and the speed-enhancing Zeal Suit to anyone who eliminates their competition. | ||
| + | * [[File:FLP.png]] UPP but not in CM13 - Pyromaniacs with access to flame grenades, flamethrowers and the [[File:ColossusSuit.png]] Colossus Suit, the slowest yet (second-)most set of armor, even (better than) next to <span style="background:#000000">MJOLNIR</span>. | ||
| + | * [[File:Gao.png]] Republic of Gao. Focused on infiltration and sabotage, they offer gear such as Agent IDs, Cryptographic Sequencers and implants. | ||
| + | </blockquote> | ||
| + | These groups will ask you to do one of the following mission types: | ||
| + | |||
| + | * [[File:NukeOp.png]] Assasination | ||
| + | * [[File:Coin.png]] Steal Coins Drop at shuttle. | ||
| + | * [[File:Cr20.png]] Steal Weapons Drop them at the shuttle. | ||
| + | * [[File:Coin.png]] Steal Coins | ||
| + | * [[File:Coin.png]] Extermination - Kill 'em all. | ||
| + | |||
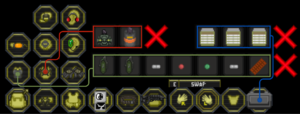
| + | Once you're geared, you will have to confirm that the ship's [[File:ShieldGenerator.png]] <span style ="color:#2ccacf">'''Shield Generator'''</span> has been enabled, as this machine greatly boosts the CRS' defenses in naval combat and against boarding actions. The ODP in orbit of the world you're headed to is equipped with a Magnetic Accelerator Cannon that could easily destroy your ship if you enter its 7 overmap tile range without shields to absorb its damage, so you'll want to raise them before approaching. | ||
| + | <blockquote> | ||
| + | <big>'''!'''</big> Settings highlighted in <span style ="color:#FF0000">'''red'''</span> are must-haves. <span style ="color:#999900>'''"Atmospheric Protection"'''</span> is helpful if the ship suffers a breach and survives until its shields recover, but you may choose to do without it let the shields last a bit longer in combat against standard deck guns and recover more quickly should they go down. | ||
| + | </blockquote> | ||
| + | You will also need to move the ship closer to the ODP, but that wont be possible until 10 minutes have passed since mission start. Here's a quick guide on how to get the ship there, should you be assigned the task when the time comes. | ||
| + | {| border="1" class="mw-collapsible mw-collapsed" style="width:50%" cellpadding="6" cellspacing="0" | ||
| + | |+ style="text-align:left;"|'''<big>Pocket Ship Flying Guide</big>''' | ||
| + | |<div style="float:right"> | ||
| + | [[File:OvermapExample.png|thumb|right|The Overmap and the helm console.]] | ||
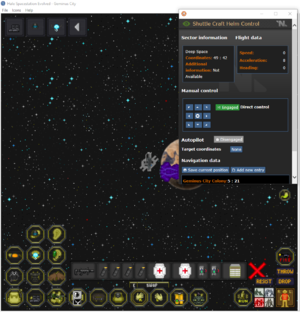
| + | Make your way towards the <span style ="color:#cd5400">'''bridge'''</span>. Once you're there, find the [[File:ConsoleCovenant.png]] '''Helm Control Console''', one is in the center of the room and the other is all the way on the west side. | ||
| + | Once you've found it, click on it then follow these instructions: | ||
| + | # Enable the "Direct Control" option - This will allow you to use WASD to fly. | ||
| + | # Identify the coordinates of the heretic world on the nav data - This is where you will fly towards. | ||
| + | # Subtract 9 from either axis (X,Y) - This ensures that you don't enter the ODP's 7-tile MAC range while leaving some margin for error. | ||
| + | # Fly to your new coordinates. For example, if NavData lists: "<span style ="color:#cd5400">'''<span style ="background:#000000">KS7-535:</span><span style ="color:#FFFFFF; background:#000000"> 137 : 82'''</span>" then you fly either to 137,73 or 128,82. <br>Along the way you may encounter <big>'''!'''</big> exclamation marks, they are space hazards that you must avoid. | ||
| + | # Reduce your speed as you approach - This is to prevent slipping into MAC range at the last moment. | ||
| + | # Bring the ship to a complete stop once you arrive at your new coordinates - It is recommended to do this with the cross-shaped button in the manual control panel. | ||
| + | # Disable the "Direct Control" option - Disables overmap view and lets you move away from the console safely. | ||
| + | |||
| + | '''<big>Do NOT use the autopilot for this</big> as it does not take space hazards into account and will place your ship directly above the planet (and next to the ODP's MAC).''' | ||
| + | |} | ||
| + | |||
| + | == Planning Your Assault == | ||
| + | After checking on the shields, you and your allies will have to decide on how to bring that ODP down so you can begin your scan. For such demolition operations, the CRS has been issued an [[File:AntimatterBomb.png]] '''Antimatter Bomb''' with a 5 minute countdown and a 30 second defusal time, along with an [[File:ConsoleCovenant.png]] '''Explosives Requisition Device''' that can be used to recall the bomb if it is lost or stolen, both located in a <span style ="color:#999900>'''room'''</span> next to the Bridge, but how you get to the ODP is to be decided by your superiors. Usually, this means either the [[File:EMinor.png]] '''Elites''' or the [[File:BMinor.png]] '''Brutes''', but if there are none then it is to be decided by whoever has the highest rank (Ultra, Major, Minor, etc.). | ||
| + | {| border="1" class="mw-collapsible mw-collapsed" style="width:50%" cellpadding="6" cellspacing="0" | ||
| + | |+ style="text-align:left;"|'''<big>Covenant Species Hierarchy</big>''' | ||
| + | | | ||
| + | # [[File:Prophet.png]] San'Shyuum (Prophets) | ||
| + | # [[File:EMinor.png]] Sangheili (Elites) | ||
| + | # [[File:BMinor.png]] Jiralhanae (Brutes) | ||
| + | # [[File:SCommando.png]] T'vaoan Kig-Yar (Skirmishers) | ||
| + | # [[File:JMinor.png]] Ruuhtian Kig-Yar (Jackals), [[File:Drone.png]] Yanme'e (Drones) and [[File:GMinor.png]] Unggoy (Grunts) | ||
| + | # [[File:Huragok.png]] Huragoks (Engineers) | ||
| + | |} | ||
| + | |||
| + | === Assault Methods === | ||
| + | [[File:PhantomLockedEast.gif|thumb|right|A Phantom set as a mobile spawn. To do this, use the "Toggle Mobile Spawn Status" verb in the "Vehicle" tab. '''Currently bugged, players must respawn then observe to be able to use them.''']] | ||
| + | ==== [[File:PhantomEast.png]] Phantom Infiltration ==== | ||
| + | Your dropships, known as "Phantoms", can be used to fly to and from the ODP. They can also be turned into mobile spawns, rendering them immobile but allowing dead players to respawn from them as Unggoy. | ||
| + | This method of entry forces most species to bring internals and use [[File:Box.png]] '''Ranger Gear''' (available from equipment vendors), sacrificing some of their protection in exchange for resistance to the vaccum of space. Unggoy and Yanme'e, however, are naturally resistant to vacuums, and the Unggoy also spawn with internals as they breathe methane instead of oxygen. Expect to be knocked down by sudden rushes of air unless you bring magboots or a [[File:VacuumShield.gif]] '''vacuum shield''' to cover the entry point (available in the supply storage bays next to the hangar bays). | ||
| + | |||
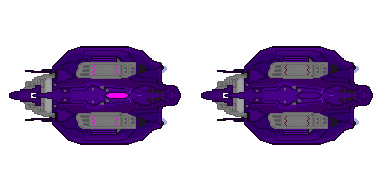
| + | One phantom is available in each hangar (<span style ="color:#fe00ff">'''starboard'''</span> and <span style ="color:#0000ff">'''port'''</span>) and the CRS must be within 10 overmap tiles of the ODP to be able to fly to it with Phantoms. | ||
| + | |||
| + | ==== [[File: BoardingPodCovEast.png]] Boarding Pods ==== | ||
| + | Boarding Pods allow you to land inside the ODP, and maybe even next to a [[File:ODPWeakpointGif.gif]] '''structural weakpoint''' on which to plant the bomb. Likewise, it could land you infront of a marine squad or a manned [[File:ChaingunDeployedEast.png]] chaingun turret. The ODP's automated alert systems will also notify the marines of your landing 30 seconds after the fact, so you'll want to move quickly. | ||
| + | |||
| + | Pods are located on the bays west of each hangar, and the Unyielding must be within 14 overmap tiles of the ODP to be able to board it with pods. | ||
| + | |||
| + | === Necessary Equipment === | ||
| + | Whatever method your leaders choose, you will need something to allow you to move around. ODP maintenance corridors mostly lack any access requirements, but these items allow you to get into the rooms holding structural weakpoints or create flanking routes during combat: | ||
| + | * [[File:PlasmaCharge.png]] '''Plasma Charges''' - Let you blow things up and move around quickly, at the expense of the element of surprise (non-existant if you podded in). Takes 5 seconds to plant and 10 to detonate. Comes in 3 types: | ||
| + | <blockquote> | ||
| + | # Standard, blowing up exclusively whatever you put it on. | ||
| + | # Breaching, blowing up whatever you put it on, a small cone infront of it and a bit behind. Keep your distance! | ||
| + | # Piercing, blowing up whatever you put it on and 10 tiles infront of it in a straight line and 3 behind. Keep your distance! | ||
| + | </blockquote> | ||
| + | * [[File:ToolbeltCov.png]] '''Tools''' - Quieter than charges, get you through airlocks a bit faster with enough practice and the wirecutters can remove [[File:BarbedWire.png]] barbed wire, yet the reduced storage space may force you to use a plasma weapon. They also let you [[Guide_to_Vehicles#Repairing_Vehicles|run repairs]] if your Phantom was destroyed and you packed [[File: Nanolaminate.png]] '''nanolaminate''' sheets. | ||
| + | * [[File:Huragok.png]] '''Huragoks''' - These biological supercomputers can interface with anything, airlocks included. They can also bolt them if you're being chased or have found a place to dig in. Downside is you will have to escort them to prevent their capture. | ||
| + | |||
| + | |||
| + | {| border="1" class="mw-collapsible mw-collapsed" style="width:50%" cellpadding="6" cellspacing="0" | ||
| + | |+ style="text-align:left;"|'''<big>Map of the ODP</big>''' | ||
| + | |<div style="float:right"> | ||
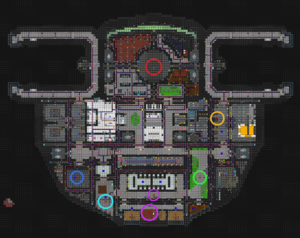
| + | [[File:Cassius_base_weapkoints.png|thumb|right|The heretic station that you must destroy.]] | ||
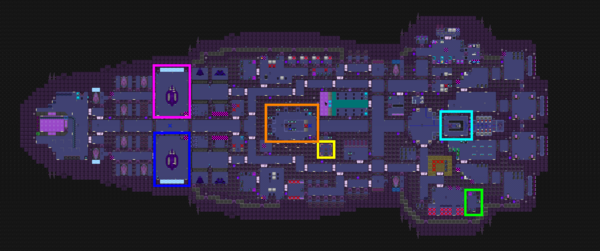
| + | ODPs always have 3 weakpoints, 2 assigned at random and 1 in the <span style ="color:#c42727">'''Magnetic Accelerator Cannon (MAC) Control Room'''</span>. The 2 random points can be located in: | ||
| + | * <span style ="color:#316de6">'''The Firing Range'''</span> | ||
| + | * <span style ="color:#e6ad31">'''Cargo'''</span> | ||
| + | * <span style ="color:#31e640">'''Gardens'''</span> | ||
| + | * <span style ="color:#31e0e6">'''The Gym'''</span> | ||
| + | * <span style ="color:#bc31e6">'''Offices'''</span> or the adjacent hallway. | ||
| + | |||
| + | You may also notice tiny blue circles near some of the possible weakpoint spawns, they are locations that Boarding Pods can target and land at. | ||
| + | |} | ||
| + | |||
| + | == Optional Objective: Disable the Magnetic Accelerator Cannon == | ||
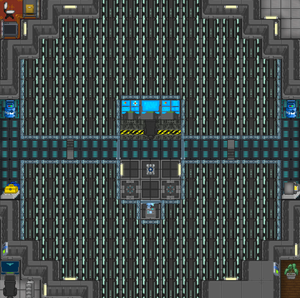
| + | [[File:MACControlRoom.png|thumb|right|The MAC control room.]] | ||
| + | |||
| + | The MAC is the only means of self-defense that the ODP has and disabling it will let your team safely attack it with the Unyielding's deck guns, or maybe with something stronger from the [[File:ConsoleCovenant.png]] '''Long Range Requisitions Console''' in the bridge. While this isn't strictly necessary, this will grant your team another method of bringing the ODP down in case the first assault wave fails, and the control room also has a structural weakpoint where you can plant the bomb. The doors leading into the control room may be blocked by [[File:BlastDoor.png]] blast doors, which can be raised from the ODP's Command Deck (the room directly southwest of the control room itself). | ||
| + | |||
| + | To break into the control room, you will need tools or '''at least''' 3 plasma charges (2 for doors leading to the Command Deck, 1 piercing to destroy the double airlocks on either side of the control room in one go) and, preferably, an [[File:EnergyDagger.gif]] Energy Dagger or some other melee weapon to bash the inner windoors. Once you're inside, you must: | ||
| + | # Destroy the [[File:ConsoleUNSCGIF.gif]] '''MAC Loading Console''' in the middle of the control board, for it allows the heretics to manually load their MAC. Charges are the '''only''' method of destroying this console, shooting or bashing it won't work. | ||
| + | # Delete the "mac_control_automated" program in the [[File:MACAutoFire.gif]] '''MAC Automated Fire Control console'''. Blowing up the console with a plasma charge will do the trick, but if you can't or don't want to use one you can also delete the program by following these steps: | ||
| + | <blockquote> | ||
| + | # Interact with the console to open the user interface. | ||
| + | # Exit the program. | ||
| + | # Open the "NTOS File Manager". | ||
| + | # Find the file and use the "DELETE" operation. | ||
| + | </blockquote> | ||
| + | |||
| + | === Defense of the Control Room === | ||
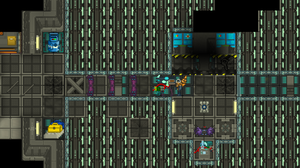
| + | [[File:BasicMACDefense.png|thumb|"Consoles are destroyed, defenses are set, bomb is armed! Nothing could go wrong now!"]] | ||
| + | If you wish to plant the bomb here, know that the control room's small space works both for and against you; if you bring a [[File:PlasmaTurretPacked.png]] '''plasma turret emplacement''' (available from weapon vendors as the "Type-52") you will be able to lock down one side of it through sheer volume of fire and keep the heretics from advancing. Turret emplacements can deflect bullets as long as you're facing in their direction, but they could start throwing grenades or rockets which you may not be able to dodge. Building defenses is an option, at the expense of reducing the space available for movement and making it harder to escape when the time comes. | ||
| + | <br> | ||
| + | Construction materials are available in the room north of the Unyielding's shield generator and in both hangars, and a [[File:HardcaseGenericCov.png]] '''Construction Materials hardcase''' will make lugging them around easier. [[File:FullBarricadeMetal.png|40px]] Full-height barricades in particular stop [[File:M9.png]] heretic grenades while also letting you shoot past them, and standard [[File:BarricadeCovSouth.png]] nanolaminate barricades have a chance to stop rockets. | ||
| + | |||
| + | <sup>''To exit turret emplacements you must drop the gun. If you see a black screen while scoped in, adjust the zoom with the buttons in the top left of your screen.''</sup> | ||
| + | |||
| + | == Getting Out == | ||
| + | Assuming you manage to find a weakpoint, plant the bomb and hold against the heretic onslaught, you will need an escape method. If you can't have a phantom fly you home, your remaining options are: | ||
| + | * [[File:EscapePodEast.png]] Find an escape pod bay and launch it to the planet, but you'll have to wait until someone can pick you up. | ||
| + | * [[File:PelicanEast.png]] Steal a dropship to escape AND deny the enemy an asset. Be prepared to adapt however, as by the time you reach the hangar you could be met by an empty bay or a group of evacuating marines. | ||
| + | |||
| + | Whichever option you choose, you will have 2 minutes (plus however many seconds were left on the bomb as you left) to leave as the platform's superstructure collapses. If you're still on the ODP as it deorbits, you'll be subject to a hefty (yet surviveable) amount of harm. Should you manage to stabilize yourself, you may radio for evac or use an escape pod to land on the colony. Note that using damaged escape pods will cause further harm, and that you will have to [[Guide_to_Vehicles#Repairing_Vehicles|repair them]] to be able to use them safely. | ||
| + | <br> | ||
| + | |||
| + | Once you are geared, in position and have your assault and escape plans, all that's left to do is take your leave towards the ODP. Stick with your squad, watch your firing lanes and don't forget the bomb. If you complete your mission and return to the Unyielding, or die while escaping but want to respawn and keep fighting for the Covenant, it is suggested you [[Reclamation#Second_stage:_Scanning_phase|read up on the next part of your mission.]] | ||
| + | |||
| + | '''<big>Good Luck, Have Fun!</big>''' | ||
| + | |} | ||
| + | |||
| + | |||
| + | |||
| + | |||
| + | |||
==Game Mechanics== | ==Game Mechanics== | ||
=== General === | === General === | ||
Revision as of 14:32, 30 December 2025
i got two turntables and a microphone
Everything up to Faction Selection, without the hyperlinks on the logos Section Name Collapsable menu with EVERYTHING on it
Put the TOC on the right side of the screen, figure out the possibility of putting it up after the icons.
Welcome to the server! This guide is meant to guide you through the basics of Halostation 13, from spawning in to getting into fights. While this page focuses on the former, links at the bottom will be provided so you can learn the initial loop of each of the server's factions.
Before you Begin
- To ensure a smooth experience, use these settings.
Rules (how cut line)
Before stepping into the fray, however, remember to read the rules to avoid risking a ban.
TALK ABOUT THE FOOD ON THE UNSC GUIDE
Character Creation (replace inner headers with bold+big(?) to keep them from apearing on the TOC when going live, keep as-is here for ease of writing)
While most of the Character Creation options, some of them the features are inconsequential, a few Already familiar with Baystation12's character setup page? Skip to the next section. [Steal this stuff from the CM13 wiki.]
Some roles spawn with different gear depending on their title, such as Marines with the "EVA Operations Marine" title spawning with armor resistant to the vacuum of space (at the detriment of protection).
Loadout tab is mostly intended? synergyc? to be used for Colonist and Insurrectionist roles, as Covenant roles cannot spawn with loadout items and they also conflict with most UNSC gear (i.e. uniforms, armor, etc.)
everything in the glasses tab overriding the HUDs
Choose Your Faction
After creating your character, you will have to choose who to fight for as each faction has different equipment, gameplay loops and motivations. Each being: Replace these with your own icons showcasing varied kinds of toons.
Use a 3by3 invisi-table. 3by4 if you decide on separating colonists. Icons Nanes Blurbs Colonists Blurb
Enjoy your stay!
Stuff above was meant for the QSG but didn't make it (except the pending URF guide), below is for the combat mechanics page.
 United Rebel Front Tutorial
Finish the UNSC guide then paste it over and replace as needed, also use the assault bit from cov guide.
The URF consists of several different groups united by their hatred of the Unified Earth Government, ranging from disgruntled colonists to political extremists.
Limited to select gamemodes.
Guns Decide attack method
| Beginners are advised to start with the "Insurrectionist" role due to their lack of responsabilities
Note: This guide uses the assault phase of the Revolution gamemode on the map KS7 as an example. Some things may vary in actual gameplay, but the general idea is the same BriefingIt's time. The Retribution is here
Gearing UpOnboard some vessels you may need to follow From the
Now, from the
After you've picked a weapon, remember to vend yourself some ammo for it. You can also store Once you're geared you must also ensure that you're well fed, as it will allow you to move without a hunger slowdown and help your blood regeneration, useful for avoiding plasma bolts and not dying from them. The mess hall is located directly starboard (i.e. north) of your bunks and has a few voice-operated machines called Making FriendsNo single URF cell can stand alone, which is why you have access to a File:MissionTerminal. Mission Terminal that can be used to take contracts for different factions. While ignoring them is an option, the gear they offer can greatly increase your odds of success.
These groups will ask you to do one of the following mission types:
Once you're geared, you will have to confirm that the ship's
You will also need to move the ship closer to the ODP, but that wont be possible until 10 minutes have passed since mission start. Here's a quick guide on how to get the ship there, should you be assigned the task when the time comes. Planning Your AssaultAfter checking on the shields, you and your allies will have to decide on how to bring that ODP down so you can begin your scan. For such demolition operations, the CRS has been issued an Assault Methods
|
ODPs always have 3 weakpoints, 2 assigned at random and 1 in the Magnetic Accelerator Cannon (MAC) Control Room. The 2 random points can be located in:
You may also notice tiny blue circles near some of the possible weakpoint spawns, they are locations that Boarding Pods can target and land at. |
Optional Objective: Disable the Magnetic Accelerator Cannon
The MAC is the only means of self-defense that the ODP has and disabling it will let your team safely attack it with the Unyielding's deck guns, or maybe with something stronger from the ![]() Long Range Requisitions Console in the bridge. While this isn't strictly necessary, this will grant your team another method of bringing the ODP down in case the first assault wave fails, and the control room also has a structural weakpoint where you can plant the bomb. The doors leading into the control room may be blocked by
Long Range Requisitions Console in the bridge. While this isn't strictly necessary, this will grant your team another method of bringing the ODP down in case the first assault wave fails, and the control room also has a structural weakpoint where you can plant the bomb. The doors leading into the control room may be blocked by ![]() blast doors, which can be raised from the ODP's Command Deck (the room directly southwest of the control room itself).
blast doors, which can be raised from the ODP's Command Deck (the room directly southwest of the control room itself).
To break into the control room, you will need tools or at least 3 plasma charges (2 for doors leading to the Command Deck, 1 piercing to destroy the double airlocks on either side of the control room in one go) and, preferably, an ![]() Energy Dagger or some other melee weapon to bash the inner windoors. Once you're inside, you must:
Energy Dagger or some other melee weapon to bash the inner windoors. Once you're inside, you must:
- Destroy the
 MAC Loading Console in the middle of the control board, for it allows the heretics to manually load their MAC. Charges are the only method of destroying this console, shooting or bashing it won't work.
 - Delete the "mac_control_automated" program in the
 MAC Automated Fire Control console. Blowing up the console with a plasma charge will do the trick, but if you can't or don't want to use one you can also delete the program by following these steps:
- Interact with the console to open the user interface.
- Exit the program.
- Open the "NTOS File Manager".
- Find the file and use the "DELETE" operation.
Defense of the Control Room
If you wish to plant the bomb here, know that the control room's small space works both for and against you; if you bring a ![]() plasma turret emplacement (available from weapon vendors as the "Type-52") you will be able to lock down one side of it through sheer volume of fire and keep the heretics from advancing. Turret emplacements can deflect bullets as long as you're facing in their direction, but they could start throwing grenades or rockets which you may not be able to dodge. Building defenses is an option, at the expense of reducing the space available for movement and making it harder to escape when the time comes.
plasma turret emplacement (available from weapon vendors as the "Type-52") you will be able to lock down one side of it through sheer volume of fire and keep the heretics from advancing. Turret emplacements can deflect bullets as long as you're facing in their direction, but they could start throwing grenades or rockets which you may not be able to dodge. Building defenses is an option, at the expense of reducing the space available for movement and making it harder to escape when the time comes.
Construction materials are available in the room north of the Unyielding's shield generator and in both hangars, and a ![]() Construction Materials hardcase will make lugging them around easier.
Construction Materials hardcase will make lugging them around easier. ![]() Full-height barricades in particular stop
Full-height barricades in particular stop ![]() heretic grenades while also letting you shoot past them, and standard
heretic grenades while also letting you shoot past them, and standard ![]() nanolaminate barricades have a chance to stop rockets.
nanolaminate barricades have a chance to stop rockets.
To exit turret emplacements you must drop the gun. If you see a black screen while scoped in, adjust the zoom with the buttons in the top left of your screen.
Getting Out
Assuming you manage to find a weakpoint, plant the bomb and hold against the heretic onslaught, you will need an escape method. If you can't have a phantom fly you home, your remaining options are:
 Find an escape pod bay and launch it to the planet, but you'll have to wait until someone can pick you up.
 Steal a dropship to escape AND deny the enemy an asset. Be prepared to adapt however, as by the time you reach the hangar you could be met by an empty bay or a group of evacuating marines.
Whichever option you choose, you will have 2 minutes (plus however many seconds were left on the bomb as you left) to leave as the platform's superstructure collapses. If you're still on the ODP as it deorbits, you'll be subject to a hefty (yet surviveable) amount of harm. Should you manage to stabilize yourself, you may radio for evac or use an escape pod to land on the colony. Note that using damaged escape pods will cause further harm, and that you will have to repair them to be able to use them safely.
Once you are geared, in position and have your assault and escape plans, all that's left to do is take your leave towards the ODP. Stick with your squad, watch your firing lanes and don't forget the bomb. If you complete your mission and return to the Unyielding, or die while escaping but want to respawn and keep fighting for the Covenant, it is suggested you read up on the next part of your mission.
Good Luck, Have Fun!
Game Mechanics
General
Population Balance
Keeps one side from having 6 elites or 30 marines. Does not take into account mobile spawns.
File:TacHUDUNSC.png HUD Drops
Officers get to call in supply drops.
Note: Personalized drops only take into account items you have equipped (hands included) at the time of opening or refreshing the pop-up tab.
Combat
Automatic Reloads
With a magazine in your active hand, you can reload your weapon with tactical and speed reloads:
- With grab intent enabled, you can do a tactical reload that will switch the magazine in your weapon with the one in your active hand. [specify times? maybe not...]
- With harm intent enabled, you can do a [name of reload that panic drops the mag] reload which is faster than a tactical reload but will drop the loaded magazine on the ground.
File:CrosshairFiring.png Click-dragging
Lets you redirect fire but wont hit as often. Also screws you if you're fighting flyers.
 Executions
Melee weapons can be used to execute unconscious enemies, allowing you to ensure they cannot be resurrected (unless they have already ghosted). To do this, click on a prone player with a melee weapon on your active hand while targetting their chest with grab intent. If you have done it correctly and the target is not braindead, you will receive a message indicating the beginning of the execution and must remain still for X seconds to complete it. Once it is finished, smack sound. /the executed player will be forcibly ghosted.
Dodge Rolling
e
o
Dodge rolling can be used to evade attacks, or quickly move across obstacles such as tables. For most species the rolling distance is 2 tiles, but some such as the T'vaoans To use it, you must create macros for the following verbs: - "roll-north" - "roll-south" - "roll-east" - "roll-west"
Notes
THIS has all the guns: https://github.com/YourPalHolidays/HaloSpaceStation13/tree/64981415f90b50a277f9a05a1185c9fcb1a0f0ba/code/modules/halo/weapons
THIS has all the vendors: https://github.com/X0-11/HaloSpaceStation13/blob/d7ea68d597b10e0b7a8b6f76f48bca84923b5034/code/modules/halo/machinery/gunvendors.dm
THIS has all the vehicles (sprites and values): https://github.com/YourPalHolidays/HaloSpaceStation13/tree/64981415f90b50a277f9a05a1185c9fcb1a0f0ba/code/modules/halo/vehicles/types
For gamemode pages:
Phase name Overview Table with what each faction can (should?) do Unknown Hazard Effects:
Asteroid Field - hurls meteors at your ship
Gas Cloud - EMPs random parts of your ship (and makes you harder to hit? confirm its not fluff)
Engine Overcharge? - increased ship speed, random explosions on ship
Paste this page into one gamemodes page.
https://projectunsc.org/wiki/index.php?title=Firefight
Old SMAC Geminus
https://projectunsc.org/wiki/index.php?title=Geographical_Intelligence
Reckon you could do a pretty sick fade-in effect with an image of each faction rallying for a raid. Remember Raze? Yeah, something like that. Replace the ARK with a fitting pict with enough transparency.
...though it may look very scuffed on Mobile.
 Covenant Tutorial
The Covenant are a hegemony of alien species rallied under the holy decree of the High Prophets: the anihilation of the human race.
Scrapyard
Use file|width=1XX% to ensure it is relative to monitors and phones.
file|500px
| The United Nations Space Command are the strong arm of the Unified Earth Government, fighting both an extinction war against the Covenant and an internal insurgency fronted by the United Rebel Front. | The Covenant are a hegemony of alien species rallied under the holy decree of the Prophets: the anihilation of the human race. | The United Rebel Front are several groups of ex-UNSC, black marketeers or simple outer colonists vying to overthrow the Unified Earth Government due to their lack of support and ovewrhelming taxation. |
|---|
| Header A | Header B | Header C |
|---|---|---|
| Cell A1 | Cell B1 | Cell C1 |
| Cell A2 | Cell B2 | Cell C2 |
| The United Nations Space Command are the strong arm of the Unified Earth Government, fighting both an extinction war against the Covenant and an internal insurgency fronted by the United Rebel Front. | style="color:green; background-color:#ffffcc;" cellpadding="10" |
| The Covenant are a hegemony of alien species rallied under the holy decree of the Prophets: the anihilation of the human race. | |
| The United Rebel Front are several groups of ex-UNSC, black marketeers or simple outer colonists vying to overthrow the Unified Earth Government due to their lack of support and ovewrhelming taxation. |
| The United Nations Space Command are the strong arm of the Unified Earth Government, fighting both an extinction war against the Covenant and an internal insurgency fronted by the United Rebel Front. | The Covenant are a hegemony of alien species rallied under the holy decree of the Prophets: the anihilation of the human race. | The United Rebel Front are several groups of UNSC defectors, black marketeers or simple outer colonists vying to overthrow the Unified Earth Government due to their lack of support and ovewrhelming taxation. |
|---|
| File:7-62mag.png | Holds thirty (30) 7.62mm caliber rounds. |
| Holds thirty (30) 7.62mm caliber rounds. |
Links saved from the QSG before rewritting:
These are the guides that are specific to halo station which cover some of the server's unique features such as the overmap flying
all the ship and base maps (which should have wikis soon, if they don't already!)

